Monday, February 25, 2013

The Underdog Dinner: Warm Salad

Before you go hating on salad for dinner, just know that their will be no soggy or wilted lettuce mentioned anywhere in the recipe. You've been forewarned.

On to better and brighter things. So I've definitely made pesto before, peppered with vibrant sundried tomatoes and almonds slivers. But this time, I opted for a more traditional basil pesto recipe. I have to admit...it was MOST delicious pesto I've ever made (maybe even better than the sundried tomato recipe!?) It's also thicker than the stuff you might get in the store because it's a tad more concentrated and certainly full of flavor!


I was inspired by my sister's friend that was telling about 21-day cleanse she was trying out. Unlike most fab diets, this one seemed to teach you how to really eat healthy, by listening to your body when you do and don't eat certain foods (i.e. more energy when I eat x,y,z!) And while I am totally against dieting, unless it's a lifestyle change and long-term commitment to a particular eating style (maybe impossible for me since I love burgers and the occasional Taco Bell), this cleanse actually striped away certain foods and then reintroduced them later, allowing your body rebuild a natural "portion control" mechanism and adjust to it.

Hmm...just wish I could remember the name of the diet. Oh well! At least I took away something positive from it!

Which leads me to this protein-powered, fiber-filled and gluten free meal! You can certainly make this vegetarian, but y'all know I love my chicken breast. Eat this at room temperature, or warm up leftovers for only a minute or so and...presto! INSTANT MEAL! So low key, just my style. 

Using an ingredient, such as pesto, is an added bonus because it's so versatile and can be repurposed in so many ways...not to mention it saves $$$!


And while I've been an, ahem, possible hater of quinoa, I'm perfecting the flavor and texture of my quinoa each and every time I make it! I mean isn't that the fun of cooking? Making something feel like your very own, impromptu or comfortable to make time and time again? Trust me, people can taste when you make a meal with a full heart and soul and it makes all the difference when cooking. 


Soulful, yet healthy. Simple, yet diverse. A perfect meal for any day. Enjoy!

Warm Chicken Pesto Quinoa Salad


Kneading Sass original 

Ingredients: 
  • 2 or 3 large chicken breasts, cooked and cubed
  • 4 heaping Tbl. basil pesto
  • 1 cup quinoa, cooked to package instructions
  • 2 cups chicken broth, for cooking quinoa
  • 1 red bell pepper, diced
  • 1 red onion, raw and diced OR 1 white onion, diced and cooked 
  • 1/2 cup mushrooms, sliced 
  • handful of crumbled fat free feta, use additional as garnish
  • Pine nuts as a garnish
Basil Pesto:
  • 1 bunch of fresh basil, stems cut off and leaves torn
  • 2 tsp. pine nuts, toasted lightly 
  • 3 cloves of garlic, minced
  • Olive oil
  • Salt and pepper to taste
  • 3 tsp. grated Parmesan cheese
Directions: 
  1. To make pesto: Literally, I mean literally, throw all the ingredients into the food processor! First, add the garlic (to make sure it gets minced well!), then add your basil and stream in your olive oil, as you pulse the ingredients in the food processor. It will slowly become a green paste, which is perfect! Add salt and pepper to taste. Add a sprinkling of cheese. Toasted pine nuts in a pan for a 2-3 minutes, on medium heat, until slightly browned and fragrant. Dump those into the food processor too and pulse away! Viola! Pesto in a flash :) 
Pulse, pulse, pulse!
    2.  Cook quinoa to package instructions. Most packages say use water, I add a little flavor with chicken broth instead. I simmer my quinoa for the full 15 minutes to ensure that it's fluffy and fully cooked.
   
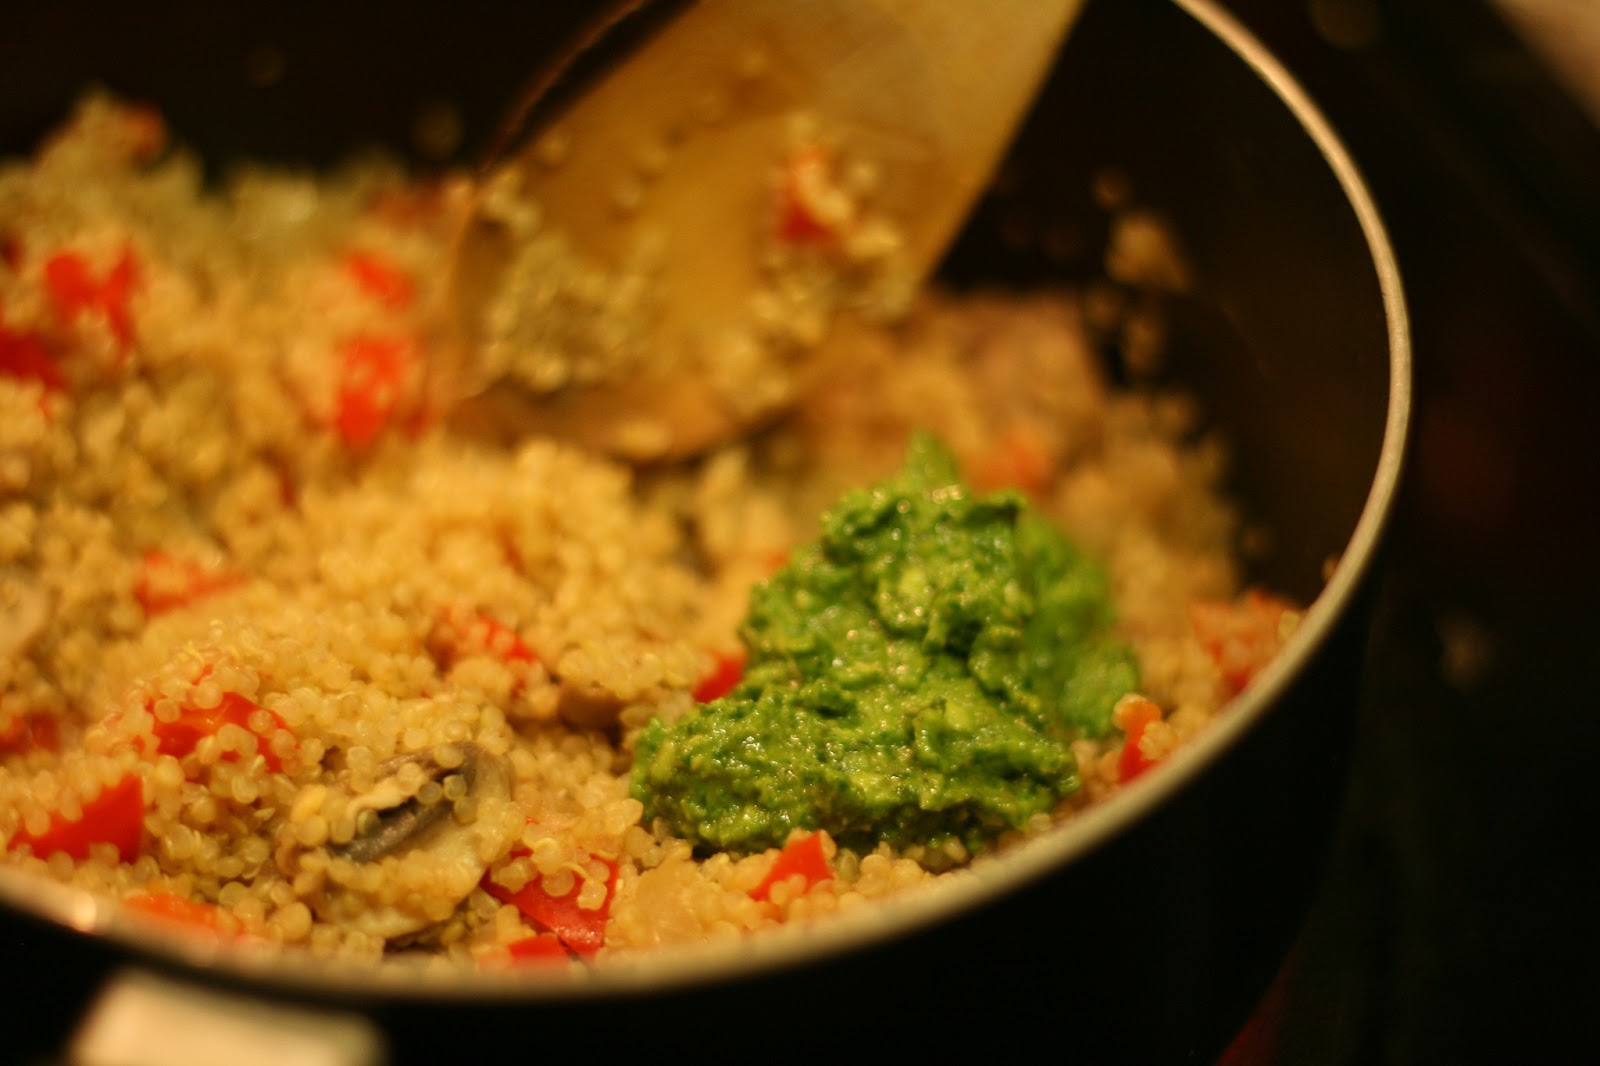
    3.  Because I used white onions, I sautéed them with olive oil and threw in the mushrooms as peppers as well, just until the onions were a little translucent. I still wanted those peppers to be sweet in crunchy! If you have red onion, just throw them into the cooked quinoa, raw, along with the peppers and mushrooms.


   4.  Add in that heaping teaspoons of pesto
.
   5.  Then add in crumbled feta and mix. 

   6.  Top with additional feta and pine nuts! (optional) Serve warm or room temperature.


Tuesday, February 19, 2013

Cake Poppin' and Such: Kneading Sass Caters a Peacock Themed Bridal Shower!

What a busy, few weeks it has been! What with the whirlwind of baking for Valentine's Day, new roommates and starting a new job tomorrow (eek!), Kneading Sass is still on my mind all day, everyday! :) It's my pride and joy...and frankly I love sharing all of my culinary adventures (and mishaps!) with you guys!

I recently catered a bridal shower for a friend's sister this past weekend and it was great practice in terms of budgeting time and money, all the while still staying true to making quality dishes. The theme of the shower was peacock, which I loved; the color scheme was so fun to work with. The hostess (aka sister ) did a fantastic job of DIY-ing almost the entire shower; everything from homemade confetti, to a custom banner and right down to stamping the most adorable cards for guests to write some sage advice, for the new bride! All of it was really thoughtfully executed and was totally a labor of love.

I catered the desserts for this event: cake pops and cupcakes, to be specific. The bride loved chocolate, so of course, everything was super rich, decadent and delish!

I was really proud of the cupcakes I made, they turned out perfectly! They were not too sweet and unbelievably moist! I wanted to share my recipe with my fellow sassy cats on here, because this cupcake is not only easy to make, but keeps well, days after baking!

The cake pops were rather tricky and not quite my forte...yet! Make them too large, and they fall off the stick. Tempering (or cooking) chocolate is a real special talent, so of course, there was lots of panic when I burned half a bag of melting chocolate! And of course, dipping them to make them look perfectly round...well that just comes with tons of practice and patience. Thank goodness for sprinkles. :)

A few DIY touches really added to the table setting!
The Cake Pop Bible by Bakerella 
Best way to harden your cake pops...standing them in styrofoam (used it for displaying the cake pops too!)
Buying colored candy melts will seriously make your life 10 times easier! 
All in all, I felt like it was a job well done :) I really enjoyed the theme of this event and having the opportunity to see the overall execution of the party...which was amazing!

I wanted to share some pictures from the event, as well as the recipe I used for the Mocha Cupcakes with White Chocolate Cream Cheese Frosting...because it's honestly one of the best cupcake recipes I've made (which means a lot, coming from a cupcake aficionado like me!)

Mocha Cupcakes with White Chocolate Cream Cheese Frosting


adapted from Gimme Some Oven

These ingredients made this cupcake super rich and sweet!
Ingredients
  • 1 3/4 cups all-purpose flour
  • 2 cups sugar
  • 3/4 cups cocoa powder
  • 2 tsp baking soda
  • 1 tsp baking powder
  • 1 tsp salt
  • 1 cup buttermilk, shaken
  • 1/2 cup vegetable oil
  • 2 eggs, at room temperature
  • 1 tsp. pure vanilla extract
  • 1 cup freshly brewed, hot coffee
  • 1 1/2 tsp. instant coffee granules 
For Frosting: 
  • 1 package (8 oz.), regular cream cheese
  • 1/2 cup unsalted butter, softened
  • 1 tsp. vanilla extract
  • 1 bar, baking white chocolate
Directions (for cupcakes): 
  1. Preheat the oven to 350 degrees. Line 24 muffin tins with paper liners. For smaller cupcakes this recipe makes about 60 little ones!
  2. In a large bowl, whisk together the flour, sugar, cocoa, baking soda, baking powder, and salt until combined.

3.  In an electric mixer fitted with the paddle attachment, combine the buttermilk, oil, eggs, and vanilla. With the mixer on low speed, slowly add the dry ingredients to the wet until combined.


4.  Add the 1 1/2 teaspoons of instant coffee granules to the cup of hot coffee and stir to combine. With mixer still on low, add in the coffee/espresso mixture and stir just to combine, scraping the bottom of the bowl with a rubber spatula. The batter will be really runny, but this is totally normal!

5.  Distribute the batter into the prepared muffin tins. Bake for 15-18 minutes, or until a toothpick comes out clean. For larger cupcakes, leave muffin tins in the oven for 18-22 minutes.


6.  Cool in the pans for 15 minutes, then remove them onto a cooling rack and cool completely, before frosting. 

Directions (for frosting): 
  1. In a double broiler, heat chocolate over simmering heat until melted completely. Remove from heat, set aside and let chocolate cool. The chocolate should still be wet and shiny, not hardened! (Then you may have overcooked your chocolate!)
  2. Beat cream cheese and butter in a large bowl with an electric mixer until completely combined. Add in vanilla and cooled white chocolate. Mix well.
  3. Frost your cupcakes by hand, with a butter knife or pipe them, like I did! I added a chocolate covered espresso bean and shaved some extra white chocolate I had on top of the cupcakes.


Ready to be transported to the party!

Monday, February 11, 2013

The Mediterranean, It Was In Your Oven The Whole Time

I'm sure you've heard of a staycation? Well, consider this meal a serious, breath of fresh air in terms of your sub par, bland and overused, chicken breast meal variations. Oh and did I mention that you can literally throw this meal together in one dish! Insanely easy clean up. 


Light, refreshing, delicious to the very last bite, this Mediterranean-inspired chicken dish is a meal sure to satisfy foodies with complex flavor palates, but also, easy and impressive for a date night at home, and perfect for any working gal/guy whose not too keen in prepping before meals. 

So this is basically the PERFECT recipe, ever. 


Four ingredients and 30-40 minutes later, you taste buds will be in R & R mode.

My muse for this dish was a recipe I found on Foodgawker for a Mediterranean bruschetta...which sounded amazing, but seriously, how often do I host a get together where I need appetizers? Holidays are long gone and with life ramping up to it's "normal" hyperactive pace, a one pan meal, with less than five ingredients is always ideal. 

I was intrigued and delighted by the acidity in this dish as well as the use of goat cheese (duh!), and instead of spreading this lovely concoction on a hunk of hearty bread, I decided to make this into a full blown meal by adding some chicken breast and eliminating the bread all together. Served with a side of couscous (to soak up all the juices from the cooked artichokes!), but the starch is totally optional.

Mediterranean Chicken with Israeli Couscous


Kneading Sass original 

Ingredients:  
  • 6 pieces of thinly-cut chicken breasts, or 10-12 breast tenders
  • 1 can artichoke hearts, drained and coarsely chopped
  • half a jar of pitted kalamata olives, sliced in halves (preferably NOT in oil, but in its own brine)
  • 1/2 cup cherry tomatoes, sliced
  • 4 oz. crumbed goat cheese 
  • 1/2 tsp dried oregano
  • 1 tsp Italian seasoning
  • Olive oil
  • Pepper and garlic powder to taste
For Israeli Couscous (optional): 
  • 1 package of Israeli couscous, cooked to package instructions (found this at TJ's!)
  • 1 3/4 cups of chicken stock (replacing water in couscous)
  • 1/4 cup pine nuts, toasted
  • 2-3 large basil leaves, coarsely chopped
  • 1/4 white onion, diced
  • 1 red bell pepper, diced
  • 1/2 cup white mushroom, sliced)
  • 1/4 cup golden raisins (optional)
  • Pepper to taste
  • Olive oil
Directions: 
  1.  Preheat oven to 375 degrees. In a large casserole dish (roughly 9 X 13 sized) places your chicken breasts or tenders in an even layer. Season pepper and garlic powder on both sides. Drizzle about 1 tsp of olive oil on top of chicken. 
  2. Right into the casserole dish (awesome right!?), add drained artichokes that have been coarsely chopped. Make sure to layer evenly over chicken. 

     4.  Add layer of sliced (in half), kalamata olives. Note: olives in oil might make this dish a little too oily, so it's safer to use olives submerged in their own brine. If you do, accidentally (like me!), buy olives in oil, no need to drizzle olive oil on your chicken.
     5.  Add even layer of cherry tomato halves.
     6. Add Italian seasoning and oregano spice to crumbled goat cheese. Then even layer goat cheese atop artichoke, olive and tomato layers. 

       7.  Bake for about 30-40 minutes, until chicken is fully cooked through and most of the liquid has been absorbed. 
       8.  For the last 3-5 minutes I changed the temperature to broil, just to brown the goat cheese topping and evaporate some of the liquid.
       9.  Serve immediately with a salad or starch (like couscous or orzo!) This dish serves 6!


For Couscous:
  1. Cook Israeli couscous to package instructions in saucepan. I substituted water with chicken broth for added flavor.
  2. While couscous is cooking. Saute onions, red pepper and mushrooms with a bit of olive oil on medium low heat until the are soft and translucent. Set aside. 
  3. Toast pine nuts on a dry pan (no oil), on medium heat until they brown just a little and are fragrant (about 3-4 minutes). 
  4. Chop basil and set aside. 
  5. Once couscous is cooked, remove from heat and add sauteed vegetables, pine nuts and basil right into the saucepan. 
  6. Here's where I'd usually add the raisins, but I didn't have any on hand this time so I omitted it! But they are, seriously, delicious and plump up nicely in the warm couscous.
  7. Add a liberal amount of pepper and mix well. 
  8. Serve immediately! 


Wednesday, February 6, 2013

Craving Burgers? Just Beet it!

Pun intended here! :) Okay, so maybe I'm not cut out to be a comedian, but this burger is made for me and my fellow sassy cats who love burgers, but don't want to splurge on the $$$ for quality burger or the calories that come with red meat!

Using beets (so pretty!), leftover quinoa (because I know all you San Franciscan's are obsessed) and cooked lentils, you can guiltlessly enjoy a  hearty burger that won't leave you feeling like a greasy spoon!


I'm starting to think I should call this the hipster series, what will all the vegan/vegetarian and gluten free-ness going on in my latest blog posts! But the true source of this inspiration was actually the much, coveted Paleo diet. Seriously, the Paleo diet is sweeping the Bay Area, let alone the country, along with its highly intense workout regiment and booty-kicker, Crossfit. While I've haven't fully engaged in either the work out or the diet, I like the that Paleo diet follows the concept of a "slow carb" diet. Basically this means that our bodies are naturally, or just have a harder time, breaking down complex carbs, dairy in overload and processed foods eaten on the reg.

What I don't like about the Paleo diet is that it doesn't make room for error, or your metabolism. It's go hard or go home FOREVER. Otherwise you seriously risk gaining all that weight back if you stop doing Paleo! (Hmm...sounds like a lot of other fad diets I've seen over the years). Anyhow, I decided to single out one the Paleo no-no's that I feel I MUST keep in my diet...that would be lentils.

In my culture, lentils ARE one's main source of protein, so eliminating it from my diet, all together, seems ridiculous. Lentils can fortify a meal with a lot of wonderful nutrients, like fiber...added plus is that they retain flavor really well, so it's all about the spices when cooking with lentils!

This burger will seriously make you beet red with delight :)

Red Beet and Lentil Burgers


Topped my gorgeous deep red beet burger with a slice of smoky gouda, a smear of tangy Dijon mustard, fresh spinach and avocado!
Kneading Sass original

Ingredients:
  • 2 packages of baby beets, cooked and peeled , shred with a grater (each package comes with about 5-6 baby beets)
  • 1/2 cup of lentils (I used green!)
  • 1 cup quinoa, cooked
  • 1/2 tsp dried thyme
  • 1/2 tsp cumin
  • 1/2 tsp cayenne pepper
  • 2 tsp  of minced garlic (1-2 garlic pods)
  • 1/2 cup of mushrooms, sliced
  • 1/2 cup yellow onion, minced
  • Olive oil
  • Salt and pepper to taste
Directions:

  1. Cook lentils in 1 1/2 cups of water and bring to a boil. Once boil, bring down to a simmer for about 30 minutes, until cooked. 
  2. Shred baby beets with a grater and set aside. 
  3. While lentils are still cooking, in a pan, saute garlic, mushrooms and minced onions with a a few teaspoons of olive oil, on medium heat. Mushrooms and onions will be soft after 6 minutes of cooking. 


      4.  Transfer mushroom, onions and cooked lentils to a food processor. Chop, not puree until mixture is chunky. Add beets to processor and chop as well. ( I had to do this in two parts because my food processor is too small to fit all of these ingredients!

      5.  Transfer chopped veggies into a large mixing bowl and add your cooked quinoa. I used leftover qunioa which also works here as well! Add all your spices and mix well.


    6.  Heat a large frying pan with olive oil or medium high heat.
    7.  With your hands, form patties and tightly compact the mixture, as the beets will make the patties more wet than if you were making burgers with ground meat.
 

    8.  Place 3-4 patties on the pan and cook each side for about 5 minutes. Got leftover patties you don't want to use? Totally A-okay! Freeze your patties, places a square of parchment paper between patty, to keep them from sticking when frozen


Friday, February 1, 2013

Superbowl Series: My Kind of Cupcaking

I know that Cupcakes and Cashmere, a coveted blog in the world of blogging, posted a recipe for macaroni and cheese cupcakes long ago, and since then it has been replicated by many (FYI C&C copied its recipe here!) Well, but isn't imitation the ultimate form of flattery anyways?


Just to set things straight, this isn't you run-of-the-mill Kraft stuff, nor is it made with expensive, hard-to-find cheeses. Let's just say that it certainly wouldn't be sassy macaroni and cheese if there weren't a few ingredients to make it a little spicy and little healthier!

This recipe is pretty much the epitome of me. It's the beautiful marriage of my love for cupcakes, in  the holiest of matrimony's with my undying quest to make the best macaroni and cheese around town. I'd like to say that I'm pretty close, if not right on the dot, with this amazing recipe!

What I love MOST about making macaroni and cheese, in cupcake form (duh!), is that it's much easier to serve and also store (I mean if you even have leftovers!). These cheesy cupcakes are perfect, I mean, seriously, made, for tailgating or game day party...hence I'd like to initiate the mac n cheese cupcake alongside infamous game day hot wings. YES, it stands next to wings at any Superbowl menu. So what's even better about making these into cupcakes rather than serving it individually? Utensils are optional! Because these pups can be devoured at room temperature, not need to fuss about shamelessly scrapping your plate for the last tiny morsel of ooey gooey cheese, you probably had that bite, long ago, when you ate it in cupcake form!


Love that I don't, need to worry about food sitting out at my party and guests complaining of unsavory, tepid food.

Did I mention that I added my BFF of winter vegetables?! Yes, I did add butternut squash to give this mac n cheese and even creamier texture, without adding on the extra cheese...and calories, of course. They boys won't know they are enjoying vegetables on game day (talking as if boys are like little kids!), but really now, people will be guessing how your mac n cheese stayed so, incredibly creamy, after baking it in the oven and letting it sit past halftime.


While you'll want to try and keep the all the focus and positive vibes on the game (Go Niners!), something tells me everyone will be hitting the food table again and again... :)

Note: Because I made these cupcakes healthier, using  whole wheat pasta and butternut squash, the dish is a bit dryer/denser than usual. Therefore, adding a tad more cheese on top (using your judgement here, I'm trusting you don't go overboard!) is advised!

Jalepeno and Butternut Squash Mac N Cheese Cupcakes

Adapted from Food Doodles

Ingredients: 

  • 1 box whole wheat, elbow macaroni pasta, cooked to package instructions or until al dente
  • 10 oz. of aged sharp cheddar cheese, grated
  • 1 cup of butternut squash puree
  • 1 cup milk
  • 1 Tbl butter
  • 1 1/2 Tbl flour (whole wheat works as well!)
  • 2 jalepenos, diced and seeds removed (unless you want this to be really hot!)
  • 1/2 cup Panko bread crumbs
  • Salt and pepper to taste
  • 2 tsp olive oil
  • Cooking spray
Directions:
  1. Preheat oven to 400 degrees, and slicing butternut squash in half, lengthwise. Be sure to chop off the stem first. Using a spoon, remove the seeds. 
  2. Place squash in a baking dish filled with 1/2 inches of water (making a water bath here, basically) and place in the oven until it's tender and your knife easily goes through the squash. The squash will be done at this temp in about 30-40 minutes. 
  3. While squash is roasting in the oven, chop jalepenos in half and with a spoon, remove seeds, just like you did with the squash, then dice them into small pieces You don't want to be handling these seeds to much because they will sting if you later touch your eyes with your hands (YES! even after washing them several times!) 
  4. When squash is finished roasting, carefully transfer to a cutting board as it will be very hot. The squash should be tender enough that you can scrap it right out the skin with a spoon. Lower temperature to 350 degrees for the cupcakes.
  5. Once you're done scraping away butternut squash into a bowl, use the back of the spoon to "mash" it into a puree of sorts. Set aside. 


    6.  Start boiling your pasta and once it's done drain and set aside.
    7.  In the same pot as your pasta, add 1 Tbl butter on medium heat. Cook jalepenos and butter until fragrant, about 2-3 minutes. Add your flour and mix well.
    8.  Bump up the heat of your pot to medium high and whisk in your milk with jalepeno, butter and flour mixture. Whisk continuously until the milk mixture begins to thicken. You might need to bump up the heat to a boil so it can get to this point.


    9.  This is when you add your 1 cup of puree, keep the temperature to a boil and whisk until combined. Whisk in grated cheese and change to low heat. Once well combined, set aside cheese and squash sauce off of the stove flame.  
   10.  Add pasta to cheese sauce and mix well with a spoon. 
   11.  In a small bowl mix Panko breadcrumbs, olive oil and salt and pepper. Set aside.


   12.  Spray cupcake tins, liberally, with cooking spray. Spoon in mac and cheese mixture and top with breadcrumbs.
   13.  Place in the oven for about 30 minutes at lowered temperature of 350 degrees.
   14.  Once they are nicely browned, remove them from the oven and let them cool for a few minutes before popping them out of the tin with a butter knife.
   15.  Serve warm or room temperature. This recipe makes 2 dozen (24) macaroni and cheese cupcakes!