Thursday, March 6, 2014

Tomato Basil Pesto Soup

The sass is back! Ten months later and making a big splash with soup!

It's a been a very long time since I have shared my love for food, cooking and sharing my passion for preparing meals! For 10 months I've been dragging my feet, with a move to a new apartment, adopting a kitten ( hello Umber!) and repairing a camera that took way too long to finally fix, am back in full sass! Thanks to all of you who welcomed me back with open arms, it was tough after being gone for so long!


In my 10 month hiatus, I have done and A LOT and learned A LOT about:
-veganism
-dairy-free cooking
-Paleo
-raw food

While some of these lifestyles, and I call them that because they truly define the ways you approach food in and out of the kitchen, are not for me 100% of the time, they all have very valuable characteristics and principles that celebrate food as something to be enjoyed and as a strong force of nutrition as well as energy. I've picked up on a number of tips and tricks that cut corners here and there --they have really helped make prep time, easier, faster and more convenient for home cooks with limited time, without ingredient fatigue.


Homemade vegan pesto is the best. Toasted cashews give it that creamy texture without the cheese!
I have been cooking up a storm in my new place, mostly perfecting existing recipes and also working with things I have at home or whatever is in season (or inexpensive!) at the grocery store. Not only have I been buying more produce, but I've been playing around with substituting starches with hearty veggies. Turning them into pastas and rice, topping them off with tons of protein!

My number one fan, Umber the kitten!
As so this left me thinking  long and hard about my comeback to Kneading Sass; I knew I wanted to make a splash (in truly, sassy fashion!) but I did not want to make anything new or complicated. Simple is my mantra these days. No more than 5 main ingredients --- all of which are easy to find and versatile for everyday cooking. I've also been cooking for the entire work week, saving a lot of money and calories, by making at least two different meals and switching off days to give myself some variety. Keeping all these culinary experiences (some failures, some successes) in mind, I decided to reintroduce myself to Kneading Sass with some soup. The perfect cure for any ailment!

Soup is AWESOME, and I truly believe this for a number of reasons:
- Soup can be prepared in large quantities (and ahead of time!)
- No need to eat it all at once, or even share your soup, freeze it for at least a month!
- Most soups have a base of garlic and onion (sometimes carrot and celery), always got that on hand!
- Not using the exact amount of any particular ingredient won't ruin your soup! (there are plenty of ways to hide mistakes in soup)


Here is lovely, San Francisco, we've finally got our dose of winter...and by winter I mean a few days of rain, cloudy weather and chilly nights. It's the perfect setting for soup

This recipe is gluten free (yay!) and can be made vegan (double yay!). Sip and slurp on this sassy soup..oh and let me know what you think!


Tomato Basil Pesto Soup


Ingredients:
  • 3 can of diced tomatoes (do not discard these lovely juices!)
  • 3 Tbl. olive oil
  • 1 small white onion, diced
  • 5 cloves of garlic, minced
  • 3 cups vegetable or chicken stock
  • 3 heaping Tbl. pesto (homemade or store bought) Alternatively, you can use about 1/2 cup of fresh basil leaves roughly chopped instead
  • 1/2 tsp dried thyme
  • 2 Tbl. agave nectar (or sugar)
  • 1 bay leaf
  • Salt and pepper to taste
  • 3/4 cups of milk + 2 Tbl unsalted butter, melted (combine these two to make half and half-like consistency), optional
Directions:


1. In a large pot, saute diced onions on medium heat, about 5 minutes until they are transparent. Add in your minced garlic and cook for one minute, until fragrant.


2. Add in 3 cans of diced tomatoes, stock, agave nectar thyme, salt, pepper and bay leaf. Stir in pesto. 

3. Bring your soup to a boil, once you see it bubbling away, bring the heat down to a simmer and cover. Let the soup simmer, while covered, for 30 minutes. Don't forget to remove your bay leaf once you are done simmering!


4. Using a blender (LOVE my Ninja blender), or blender stick, you can emulsify your soup making it smoother in texture.
5. Using a ladle spoon, slowly add all your soup mixture into you blender. If you are using an immersion stick then be sure to cool your soup mixture for a few minutes, it is possible that some soup will splatter, so it's best you save yourself from a burner! Or just use a blender, honestly, it is
MUCH safer.

6. Blend soup for about 30 seconds, until smooth. Add in milk mixture and blend again for another 30 seconds.
7. Serve piping hot with an extra teaspoon of pesto on top. Goes great with a gooey grilled cheese sandwich or toast!


For storage, store cooled soup in an air tight container. Without the dairy your soup should be good in your fridge for about 1 and half weeks. With our without dairy, your soup should freeze well for 1-3 months.

Serving size: 6-8 soup lovers!

Thursday, July 11, 2013

Green with Envy: Move Over Taco Tuesday, Enchiladas are Stealing the Spotlight!

Everything about this dish is green...in both a literal and figurative sense. If the rainbow chard and zucchini aren't enough for your, the creamy avocado enchilada "sauce", blended with tomatillo salsa (or salsa verde) will certainly quell your craving for dairy.


Almost vegan, accidentally gluten free and purposefully vegetarian, this dish is grate for any potluck party, dinner party or great substitute for ho-hum salad on a hot summer day. Unfortunately (of fortunately?), I had no leftovers which is obviously a sure sign that this was a winning dish.

What I LOVE about enchiladas, tacos, you know..all that gringo Mexican food is that you can throw whatever you have in the fridge and make something that tastes above decent and looks pretty damn impressive. I certainly did not throw in the contents of my fridge for this enchilada because I didn't want to mask flavors, but rather bring them front and center and make them feel cohesive. Some other great veggies that would bring this dish together include:

  • mushrooms
  • spinach (instead of chard)
  • red onion (they get super sweet and yummy in the oven)
  • yams or sweet potatoes (peeled and cut into small pieces


I wanted my ingredients to shine; I wanted people to taste the flavor of the rainbow chard stems and heighten the flavor of the creamy ricotta cheese (traditionally used in Italian foods), with a kick of jalapeno.

Notice how there are no beans? Between the sturdy and fibrous chard and heaviness of avocado, beans would have been overkill.

The flavors are just as bright as the colors, but nonetheless, this dinner is refreshing, light and easy to share. So don't be green with envy because of how delicious this looks, y'all can have the recipe and feel a little better about drinking that extra margarita on enchilada Tuesday! Go on girl (or boy!), you deserve it!


Creamy Avocado, Rainbow Chard and Caramelized Onion Enchiladas  


Ingredients:

  • 1 pack of corn tortillas 
  • 1 bunch of rainbow chard, rinsed well, leaves and stems chopped
  • 1/2 white onion, sliced thinly
  • 1/2 cup corn (fresh, canned or frozen are fine)
  • 3-4 garlic cloves, minced
  • 1 tsp red chili flakes
  • 1/3 cup water or vegetable broth
  • 1/2 cup ricotta cheese
  • 1/2 jalapeno, seeded and minced (roasted and then minced would be delish as well!)
  • Salt and pepper to taste
  • 2 ripe avocados 
  • 1 1/2 cups of tomatillo salsa or your favorite salsa verde (I love the Trader Joe's salsa verde; use the whole bottle of that if you decide to use it for you sauce!)
  • Olive oil
  • Cooking spray
  • Green onions, sliced (optional, as a garnish)
Directions:

1.   Preheat oven to 350 degrees. Grease casserole dish, I used a 9 X 9 inch dish; set aside.
2.   Heat 2 Tbs. of olive oil on medium heat. Add you onions until they become soft and translucent, about 4-5 minutes.
3.   Next, add your garlic and let it become fragrant, about 30 seconds, before adding your chopped chard. 


4.   Rainbow or swiss hard are pretty sturdy greens, so after cooking for about 3 minutes, add in a water or broth and cover. The chard will wilt and soften after another 4-5 minutes, covered. 
5.   Super simple, add in you salt, pepper and red chili flakes and corn, cook for another 2-3 minutes.


6.   My jalapeno was VERY spicy, so I only added 1/2 of it and I seeded it, but sometimes you get a pretty mild pepper and might want to add the whole thing, without seeds. I wanted to play it safe and not play Russian roulette with my pepper! Pop that pepper into a food processor and let it rip until it's finely minced. Add ricotta and blend again.

7.   Rinse your food processor with warm water and soap before making your enchilada sauce.
8.   In your cleaned food processors add salsa verde and 2 ripe, avocados. Blend well for about  30 seconds, it will be very creamy. Ripe avocados will make this creamy; 2 were plenty for my portion, but by all means use another avocado or one less if you want it less creamy. You won't miss the dairy, trust me!


9.  To assemble enchiladas: wrap tortillas in a damp paper towel and warm in the microwave for about 20-30 seconds; this will help prevent your tortillas from breaking when filling them. Take a tortilla, spread some ricotta cheese, add in about 2 tsp. of the vegetable filling and roll them on the counter top or plate. Place in your baking dish, seam side down. 


10.   Continue filling and rolling tortillas until your dish is filled or you run out of tortillas!
11.   Slather the enchilada sauce with a spoon, making sure to coat all the edges of tortilla with sauce; would hate to have a dry enchilada!
12.   Bake in the oven for 25 - 30 minutes, uncovered, and serve immediately! This recipe feeds about 6 people, two enchiladas each. 


Monday, June 17, 2013

A Grown Up Vegan Picnic: Giving Offices an Excuse to Eat Healthy

Hiatus is officially OVER, my camera is 100% in tip top shop and I've been snapping away...in fact, I've already lined up the next few posts!

It's always awesome when you love what you do and to be surrounded by people whose company you enjoy, even during the most stressful times. On my first day, at Fair Trade USA, I was, somehow, (and thankfully so!) signed up for the vegan/vegetarian lunch club, which has challenged my culinary prowess, creativity and even my budget. Cooking for 7-9 people isn't the easiest task, especially if you have a hard time cooking for ONE...needless to say, I spent a good week and half pondering what to make for lunch club because I was so damn excited. What with the warmer weather and sunshine, I thought, a picnic was in order, a grown up picnic to be exact! A vegan take on some picnic staples and some DIY enthusiasm, and I'd say that this lunch club was a home run!

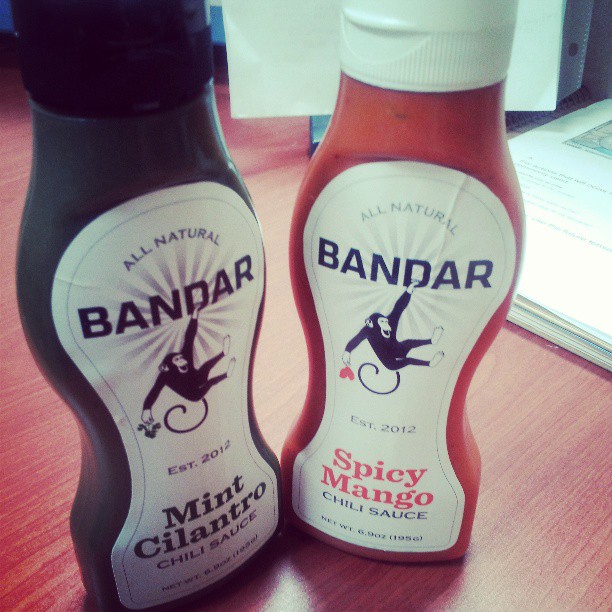
AMAZING hot "sauces", well chutneys really! They are ridiculously spicy and I can't stop putting this on everything I eat!
I had so much prepping for it! My biggest challenge was knowing that I had to transport everything on BART, during morning rush hour...and I don't have a full kitchen in my office, so of course there where preparation limitations!

I love getting detailed and complicated when it comes to planning "catering" event, or lunch club event like these; but I showed restraint and kept it real, simple. I'm glad I did, because was completely STUFFED after lunch and I barely had any leftovers to take home. A vegan meal has made ME full... I think hell just froze over?!?

I kid...

To be honest, the entire main course was vegan, I cheated on dessert and did  a DIY frozen yogurt bar, which, to my defense, was the best idea ever! There was plenty of fresh fruit to satisfy the fewvegan lunch clubbers with a sweet tooth. I had a few dairy sides, such as Havarti cheese and feta Greek yogurt spread , made an appearance, but again, as sides, they were totally optional and meant for those dairy-fiends who just cannot eat any kind of burger without cheese (ahem, ME!)

Here's what was featured on the menu:

Quarter Pounder Beet Burgers
Portobello “Steak” Sandwiches
Lemony Arugula Almond and Dried Cranberry Salad
Homemade Roasted Garlic and Jalapeno Aioli 
Frozen Yogurt + lots of yummy toppings!

A vegan feast indeed! Check out some of the recipes below. You may have noticed I modified my beet burger; this second recipe holds its shape way better, because I froze them, and tastes more like it's straight from the grill! Make these ahead of time and freeze them to eat any day!

Quarter Pounder Beet Burgers 


Ingredients:
  • 2 packages of Trader Joe's Peeled and Cooked Beets, shredded 
  • 1 1/4 cups of Trader Joes' Cooked Brown Lentils
  • 1 cup brown rice, cooked and cooled to room temperature
  • 3-4 cloves of garlic, minced
  • 1 tsp cumin
  • 1 tsp red chili powder or paprika
  • 1/2 dried thyme
  • 1/2 cup white onion, minced finely
  • 1/2 cup breadcrumbs (optional, and without these this meal is gluten-free!)
  • Salt and pepper to taste ( I added lots of pepper)
  • Vegetable oil
Directions:
1.  I recommend cooking brown rice ahead of time or using old rice works great here! Meanwhile with a grater, grate beets and then add beets to your food processor.


2.   Add cooked lentils to food processor, along with cooled rice. Pulse about 15-20 times, until the texture is still a little course, but beets, lentils and rice are well combined. It will really look like raw meat  here, AMAZING!


3.   Transfer mixture to a large mixing bowl. Add cumin, salt, pepper, chili powder and thyme. Mix minced garlic and onion in well. I did NOT use breadcrumbs because we had some gluten-free folks, needless to say, if you can handle a bit of breadcrumb, do it! They help hold these semi-fragile burgers together better. 
4  . Form patties using a tablespoon or with a 3-inch cookie cutter round (to make them uniform!) I used a tablespoon; I took one heaping tablespoon of the mixture, rolled wit my hands into a ball and slightly flattened them. I layered the bottom of my tupperware with parchment paper, fitting 3-4 patties per layer. I separated each layer with parchment paper as well. Cover tupperware with lid and freeze for at least 30 mins. (I froze mine for about an hour)
5.   In a large skillet (or griddle), heat 1 tbl. vegetable oil at medium heat. Place 3-4 patties on skillet and cooked for about 5-7, on each side.
6.   I served my patties in a toasted pita pocket with some arugula salad, cucumber slices, feta Greek yogurt spread and avocado slices.

Portobello "Steak" Sandwiches with Roasted Garlic Jalapeno Aioli
Ingredients:
For Sandwiches:
  • 9 portobello mushrooms, sliced
  • 1 large red bell pepper, sliced thinly
  • 1 large white onion, sliced thinly
  • 1 tsp garlic salt
  • 1 tsp dried basil
  • 1 tsp dried thyme
  • 1 tsp dried oregano
  • Lots of black pepper
  • Olive oil
  • Sourdough bread (or any bread you love) to serve as an open-face sandwich
For Aioli: 
  • 1 head of garlic, roasted and peeled
  • 2 jalapenos, halved, roasted and seeded
  • 1 cup mayonnaise 
Directions:
1.  Preheat oven to 375 and roast an entire head of garlic, pods separated on a cookie sheet, with the peel still intact. Add halve jalapenos to cookie sheet.

Post roast!
Don't forget to scrape out those seeds!

2.  Roasted for 20-30 minutes, pods will start to pop out of the peel and jalapenos will begin to soften.
3.  Once garlic is roasted, remove from pods and place in a food processor with mayo and jalapenos. Blend until completely smooth. Store in airtight tupperware for about 5-6 days. This stuff tastes even better, the days after, because all the flavors infuse into the mayo, making it taste less like mayo and more like heaven.

4.  Coat bottom of a large skillet with olive oil. On medium heat, add mushrooms and cook until just softened. Set aside and use the same pan to cook veggies.


5.   Add red pepper and onion, cook for 5-6 minutes. Add in oregano, basil, garlic salt, pepper and thyme. Cook for another 2-3 minutes.


6.   Finally, add in cooked mushrooms and cook for another 2-3 minutes.
7.   Serve on toasted sourdough bread, slathered with homemade aioli and a slice of havarti cheese!

Tuesday, May 28, 2013

Spring into Spring: DIY Brown Rice Spring Rolls and Homemade Wonton Soup

There is nothing like adding your own toppings to frozen yogurt right? Or customizing a coffee drink? Adding  that runny egg on your burger is like the icing on the cake for me!

So trust me when I say that you'll experience the same kind of satisfaction with these vibrant, healthy, gluten-free and frankly, very easy homemade Vietnamese spring rolls.

Mix and match veggies and protein to make for satisfyingly healthy lunch or dinner! I added some cooked shrimp with a dash of fresh lime juice, but braised tofu is also an excellent filler!

Now while I never really drank the brown rice Kool-Aid, growing up with Basmati rice, a long-grain white rice that is buttery and delicious, there is a certain lightness to brown rice spring roll wrappers that makes them less gummy and thick. Instead, you'll taste the crispy, crunch of your veggies, not a mouthful of gooey sticky white rice wrappers...or at least that's what I tell myself to justify a late night trip to Whole Foods in Portero Hill!


The wonton soup was equally as simple and fast. In less than 25 minutes, I've made my "own" broth and fresh wontons. I was quite impressed. The best part is making those little wontons; filling them folding then shaping. You could really TASTE the freshness of using unprocessed ground chicken, fresh spices and herbs. They plumped up quite nicely in the broth, making it a lovely meal on its own.


But that's my style, I go full sass ahead, making two dishes, instead of one! In case you guys haven't caught on, I love having options.

Again, half this meal is gluten-free (the spring rolls) and has great potential to be vegetarian; I really think my ultra liberal, super-left, living/work situation in San Francisco and Oakland has gotten the better of me...and it's awesome!

I know it seems like there are a ton of steps below, but trust me, it goes by quick! Cut your veggies, wrap and repeat!

Brown Rice Vietnamese Spring Rolls with Shrimp and Ginger-Garlic Chicken Wonton Soup


Adapted from Simple Reem

Ingredients:

For Spring Rolls:
  • 1 cucumber, seeds removed and cut thinly
  • 1 sweet pepper, cut into thin strips
  • 1 -2 carrots, peeled and grated ( I didn't have them on hand so I skipped this!)
  • Fresh mint springs, thinly sliced
  • 1/2 cup, cooked shrimp, tails removed
  • 1 package brown rice spring roll wrappers
  • Lime juice
  • Dash of tamari or soy sauce
  • Chili sauce (use sparingly!)
For Wonton Soup
  • 8 cups of chicken broth
  •  1-2 Shanghai bok choy, sliced
  • Handful of minced chives
  • 2-3 cloves of garlic sliced
  • Several slices of fresh ginger
  • 1 Tbl olive oil (or sesame oil if you have it on hand)
  • 1/3 lb of ground chicken or turkey
  • 1 tsp minced or grated ginger
  • 2-3 cloves of garlic, minced
  • 2 Tbl tamari or soy sauce
  • 1-2 tsp chili hot sauce
  • Fresh lime juice 
  • 1 cup lukewarm water (to seal wonton wrappers) 
  • Wonton wrappers (makes about 10 wontons) 
 Directions:

For Spring Rolls:

1. Julienne (or attempt to julienne) your veggies for the spring rolls. I used yellow peppers, cucumbers (with the seeds removed) and fresh mint. Grated carrots would be excellent in here, I just didn't have any on hand. Bamboo sprouts would also give this a nice crunch as well. Cut as thinly as possibly without cutting your fingers!


2. Lightly marinate your cooked shrimp (tails removed) with soy sauce and fresh lime juice. Begin assembling your springs rolls! Yes it's that easy :)
3. Remove one spring roll wrapper and follow instructions for softening the wrapper. Usually it involves submerging the wrapper (one at a time, to avoid having them stick together!) in bowl of warm water (not hot!)
4. Briefly soak wrapper in warm water, otherwise the wrapper will become very sticky and start sticking to itself. Remove and place on a plate.
5. Assemble veggies about 1/3 away from the edge of the wrapper. This will allow you to roll the spring roll tightly, leaving enough room for all the fixings!


6. Begin rolling the wrapper, ticking the excess wrapper and placing on the plate, seam side down. Make a few and save for the lunch the next day. Serve with peanut sauce.
Note: I'm not the best spring roll wrapper, but this method certainly kept all the veggies neatly in the wrapper!

For Wonton Soup:

1. In olive oil, over medium heat, add slices of garlic and ginger to a large pot. Cook until fragrant about 1-2 mins.
2. Add chicken broth and chives to pot and bring to a boil. Add in soy sauce (or tamari), rice vinegar and hot sauce.

3. Boil broth for about 10-15 mins, to allow all the flavors to seep into the broth. Remove ginger and garlic slices with a slotted spoon.
4. While broth is boiling, begin assembling wontons.
5. Prepare ground chicken or turkey. In a mixing bowl, combine ground meat, grated ginger, minced garlic, chili sauce, soy sauce and lime juice with your hands to make sure the meat is well seasoned.
6. Wash hands and on a clean surface begin making wontons.
7. Have a cup of lukewarm water handy. This will be the binding agent for the wontons.
8. Take one wonton wrapper and with your fingers, wet edges of the wrapper with the water. Place about 1/2 tsp of ground meat mixture at the center of the wrapper.


9. Fold one edge diagonally, to the other edge, forming a triangle. Press firmly along edges of the triangle, to ensure that none of the filling is seeping out (I overfilled a few wontons and they broke in the soup! Not to worry if this happens, just less is more!)


10. Bring the two corners of the wont wrapper up and pinch them together. Assemble all the wontons before adding to the soup. I made about 10-12 wontons.


11. Add wontons to boiling broth and continue to cook for about 5-7 mins. Then, add in your bok choy. Note: The raw meat will cook completely in the boiling broth, a great way to NOT worry about undercooked  poultry.  Serve immediately.


ANOTHER NOTE (annoying, I know): The wonton soup soaks up a lot of a the broth, so any leftovers should be eaten the next day. However, if you make extra springs rolls, they keep well in some tupperware for the next 2-3 days!