Thursday, October 18, 2012

The true meaning of comfort food

We all have our own favorite dish that we instinctively reach for when stressed, in crisis or just full of joy. Either way, I was needing some soul food, literally food for my soul. Now, some of you may know that I have a particular penchant for macaroni and cheese, where finding the perfect mac n cheese is on my lifelong list of goals and bucket list, so to say (perhaps an odd one at that). This is the second time I've made this recipe, with a few tweaks to it here and there, it's still not perfect, but I gave it all my love anyways. 

Here's is exactly what I learned this time around and will not repeat the next time I make this self-proclaimed (and I really believe it in my heart), "best mac n cheese" recipe:

  • Do not add dried thyme. I'm not sure if fresh thyme would have been a milder flavor, but I think herbed goat cheese is plenty of herb to take in. 
  • Do not use sharp white cheddar/gruyere blend. God bless Trader Joe's for making all of us twenty-something year olds lives easier, but buying two cheese in one wasn't the best idea for this recipe! (Although, this would be excellent to melt into a cheese fondue). While I liked the idea of buying  two cheeses for the price of one, I'm not sure if I liked the nutty aftertaste in my mac n cheese. It's overpowering, with all the herbs already going on. Next time, I shall defer to the original recipe's suggestions, which call for parmesan, sharp white cheddar and herb goat cheese.
  • In an effort to be healthy I added broccoli.  WOMP! If this was a creamier, yellow cheddar mac n cheese, broccoli would have been a fitting addition...not so great with goat cheese here. Mental note made. 
  • Again, in another effort to be healthy I used wheat pasta. I mean it's MACARONI AND CHEESE WITH BACON...what was I thinking!! This particular recipe couldn't be that much healthier just because I used a whole grain elbow macaroni pasta. 
  • Less flour in my roux. Roux's are tricky business, in one minute, flat, you can ruin your roux. I'm not kidding, as I've done this many times before. For those of you who have no clue what I'm talking about here, a roux is a type of butter, flour, milk, base or thickening agent for creamy sauces like a bechamel, alfredo or, say... a macaroni and cheese. My roux called for 1/2 cup of flour, which seems like a lot, so decided to agree on 1/3 cup, not exactly the right math. Typically, roux's have a few tablespoons of flour, I think I masked a lot of the cheesy flavors happening by adding too much flour, causing my mac n cheese to be really dense and thus lacking in flavor.
  • I'm 50/50 about using Italian seasoned Panko breadcrumbs. Dare I say it was too crispy for my taste!? Maybe just using less of it would have been better. 
Well, I'm certainly a harsh critic on myself, but I truly believe I can make the best, darn, homemade mac n cheese, with a little bit of luck and persistence for nailing down the right recipe. 

Homemade Herb Goat Cheese Macaroni and Cheese with Bacon

Bacon, goat cheese and red wine... I'm in heavan!
adapted from Recipe Girl

Ingredients:

Breadcrumb Topping: 
  • 2 cloves garlic 
  • 3/4 cup Italian-style Panko breadcrumbs
Mac n Cheese: 

  • 12 oz. (1 package) center-cut bacon, chopped into 1-inch pieces
  • 2 tbl butter
  • 1 pound whole grain pasta (elbows or shells), cooked until very al dente ( a little crunchy, as it will cook further in the oven)
  • 3 1/2 cups whole milk, heated until warm
  • 1/3 cup all-purpose flour
  • 1tbl dried thyme 
  • 1 tsp mustard powder
  • 1 tsp red pepper flakes
  • 3/4 tsp kosher salt, or more to taste
  • 1/2 tsp freshly ground black pepper
  • 12 oz (or 4 cups) sharp white cheddar/gruyere cheese blend, shredded & divided
  • 8 oz herb & garlic flavored Chevre cheese (goat cheese), crumbled
  • 1/2 cup grated Parmigiano Reggiano cheese
Directions:
1. Preheat oven to 375 degrees F. Butter a 3 to 4 quart casserole dish.
2. Cook pasta until almost al dente, strain and set aside. 
3. Prepare breadcrumbs: in warm skillet, brown Panko breadcrumbs for 3-4 mins, until light brown. Set aside to sprinkle on top of mac n cheese later.
4. In a large skillet, sauté bacon until it is almost crisp. Remove bacon to paper towels to drain. Spoon out oil from pan, reserving about 1/2 tablespoon of bacon drippings. Add 2 tablespoons butter to the bacon drippings and heat to medium. When butter sizzles, add flour and cook, stirring, for 1 minute. Slowly pour hot milk into flour-butter mixture while whisking. Continue cooking, whisking constantly, until mixture bubbles up and becomes thick. 
5. Remove pan from heat and stir in thyme, mustard powder, red pepper flakes, salt and pepper. Then stir in 3 cups cheddar/gruyere and Chevre and Parmigiano cheeses.
6. Stir cooked pasta and cooked bacon into the cheese sauce. Pour mixture into prepared casserole dish. Sprinkle remaining cheddar onto the pasta. Scatter breadcrumbs over the top.
7. Bake until browned on top, about 30 minutes. Check at 15 minutes to make sure the breadcrumbs aren't browning too quickly (if they are, just place a sheet of foil loosely over the top). 
I "sort of" tried to half this recipe. Perhaps the next time around I will do a better job of that. Needless to say, this dish was still good, but it has the potential to be better! It still came out of the oven looking like a winner!

Tuesday, October 9, 2012

A girl can dream of a big ktichen

It's always a treat when I get to cook for others. Of course, we all seek the praise and affirmation of our friends and family, but they are also the most likely to be honest and blunt about whether or not you are the BEST or could be BETTER at something. 

I was going back and forth thinking I wanted to be really daring and ambitious, with such a large kitchen at my disposal, I wanted to whip up something complicated. But I was conservative and went with a favorite. A simple oven baked rosemary chicken dish that packs a lot of flavor without the calories; this recipe is originally from Cooking Light, with only one modification, believe it or not! 

A great insider's tip for any cook or baker: 1 cup of buttermilk = 1 cup of yogurt

BAM! The secret is out! Cut the fat, and maybe more than half, by substituting recipes with regular or greek yogurt instead. 

Side Note: I am a huge fan of Cooking Light, for two reasons: they provide great, everyday recipes that are slimmed down and their recipes cater to beginner cooks who want to learn basics that they can eventually build off of. 

Oven Baked Rosemary and Walnut Chicken

Crispy Panko breadcrumbs and the crunch of those walnuts give this chicken a bite like none other.
adapted from Cooking Light

Ingredients:
  • 1/4 cup low-fat buttermilk ( I used yogurt here instead)
  • 2 tablespoons Dijon mustard
  • 4 thinly sliced, chicken cutlets
  • 1/3 cup Panko (Japanese breadcrumbs)
  • 1/3 cup finely chopped walnuts 
  • 2 tablespoons grated Parmesan cheese
  • 3/4 teaspoon minced fresh rosemary
  • 1/4 teaspoon kosher salt
  • 1/4 teaspoon ground black pepper
  • cooking spray
  • rosemary leaves (optional)
Directions:
  1. Preheat oven to 425 degrees.
  2. Combine yogurt and mustard in a shallow dish, stirring with a whisk. Add chicken to yogurt mixture, turning to coat.
  3. Heat a small skillet over medium-high heat. Add panko to pan; cook 3 minutes or until golden, stirring frequently. Combine panko, nuts, rosemary, pepper and salt in a shallow dish. Remove chicken from buttermilk mixture; discard buttermilk mixture. Dredge or coat chicken in panko mixture until evenly and completely covered.
  4. Arrange a wire rack on a large baking sheet; coat rack with cooking spray. Arrange chicken on rack; coat chicken with cooking spray. Bake at 425 degrees for 20-25 minutes or until chicken is cooked. Garnish with rosemary leaves. This dish is great with a side of salad, vegetables or sliced into a salad, for a healthy leftover lunch. 

Thursday, October 4, 2012

When in Boston...

Well, Boston is about the prettiest and cleanest city that I have seen in a long time... one for the bucket list really; Boston in the fall, CHECK

My trip consisted of walking, and eating, and then more walking...and the more eating, sprinkled with some historical landmarks and a fashion show, in between. It was the perfect getaway from the SF hustle and bustle. My bestie, Grace, is an unpretentious but, equally critical foodie, like myself, and we had a grand time eating our way through Boston (well minus the slight food poisoning!)

Inspired by a sample at Trader Joe's (true story!) we made an impromptu, Monday night dinner in her adorably, cozy studio by Fenway. Using our imaginations, we combined marinara sauce, polenta and  andouille chicken sausage, amongst a few other ingredients, to make a healthy and quick dinner for two. But first, I have to indulge y'all in all the wonderful food I consumed during my short, but memorable time in Boston. Check out my photo homage to Boston's finest, food offerings: 


Lemon Ricotta Pancakes,  perfect amount of sweetness, fluffy and melts in your mouth. (From Cafe Luna)
Breakfast Mac n Cheese, the best idea ever. That runny egg on top and bits of  bacon, plus that cheddar jalapeno sauce, made this dish extra special. (From Cafe Luna)

The alleged, culprit of Grace's food poisoning?! (An A for presentation though!) 
The perfect Fall beer, creamy yet light! I am huge fan of Abita. Try the Raspberry Wheat and Strawberry Wheat, they are both lovely.

Fried Oysters. (From B & G Oysters)
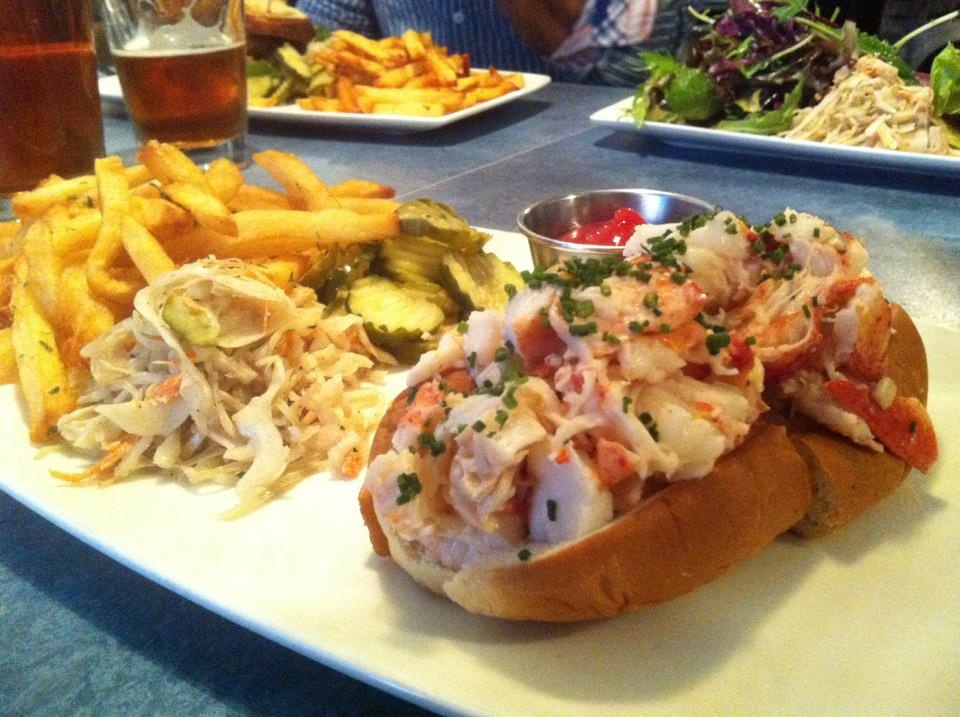
My first Lobster Roll. It was fresh and the fries were crispy, loved them both!

Home brewed coffee and a Pecan Sticky Bun from flour bakery. Best post-food poisoning breakfast? I think so. 

Spotted this Pistachio Cream Cupcake after hanging out at Harvard (NBD!); what great presentation. (From Crema Cafe)
Yup that's me getting my caffeine fix, I'm totally in my element. 

Sipped on a latte and munched on this Hazelnut Cannoli from Mike's Pastry, a MUST DO in Boston. 

Andouille Chicken Sausage atop Italian Style Polenta
What happens when I cook with my best friend, this gorgeous and tasty thing! Check out the recipe below. 
So this recipe is a Sonya and Grace original! I would make this dish again, except I would cook the polenta discs in the marinara sauce, that way the sauce is totally absorbed into the polenta, rather than just adding a tomato-ish flavor on top of this dish. Really easy ingredients here, with interesting textures and, a surprisingly, more complex flavor profile than I expected.

Ingredients:

  • 1 cooked polenta roll from Trader Joe's, cut into 1/4-inch, round discs (we cut 4 discs from this roll, allotting 2 discs per person. But you can use as many as you like!)
  • 3-4 tbs. of your favorite marinara sauce
  • 1 or 2 links of cooked andouille chicken sausage from Trader Joe's, sliced
  • 1/2 zucchini, cut into thin slices
  • a handful of cremini mushrooms, diced
  • shredded mozzarella cheese
  • olive oil
  • salt and pepper to taste

Directions: 

  1. In a a few teaspoons of olive oil, pan fry polenta discs on medium high heat for 3-4 minutes on each side. I've been told that using butter make for a crispier and less "wet" polenta; I'll have to try that next time!  
  2. In another skillet, add olive oil to medium heat. Add zucchini, mushrooms, salt and pepper. Cook until zucchini is translucent and mushrooms are soft. 
  3. Heat marinara on the stovetop or in the microwave. I think this step would be better added to cooked polenta, letting the discs stew in the sauce, letting the sauce seep in.
  4. Remove polenta from heat and add sliced, sausage. Cook until slightly browned. 
  5. Plate marinara sauce, add polenta discs on top. Pile veggies and sausage atop polenta. Finally, top with shredded mozzarella cheese. This recipe serves 2, but can easily be scaled up to served more people. 

Wednesday, September 26, 2012

Enchiladas for the lazy gal

Presentation can often be the key in cooking, especially when you become more advanced and comfortable with it, people definitely eat with their eyes (guilty here!) Now I know rolling up corn tortillas isn't exactly rocket science, but making and enchilada casserole just seemed way more efficient, a guess what, I think this dish still looked delicious, rolled up or it. 

I used my Shredded Mexican Chicken recipe (love repurposing recipes like this!), to make a healthier chicken and cheese enchilada. The great thing about this recipe is that you can add or take away whatever ingredients you want. The original recipe called for pinto beans and olives, but I omitted them since I wasn't feeling the beans and olives just add extra fat (and of course, I'd rather add more cheese!) By adding bell peppers, black beans, corn, you name it, these enchiladas make it a very versatile; with that said, I adjusted this recipe a lot, so feel free to do the same!

Chicken and Cheese Enchilada Casserole


Hearty and healthy!
adapted from My Recipes on Cooking Light

Ingredients:

  • Shredded Mexican Chicken
  • 1/2 cup thinly sliced green onions (about 4-5 green onions)
  • 12 (6-inch) corn tortillas, divided in half
  • Cooking spray
  • 2 cups (8 oz.) pre-shredded reduced fat 4-cheese Mexican blend cheese, divided
  • (16-ounce) jar of your favorite green salsa (I chose a green salsa from a brand called Frontera)
  • 1/4 cup reduced fat sour cream
Directions:

1. Preheat oven to 350 degrees. Layer 6 tortilla halves on bottom of a 13 x 9-inch baking dish coated with cooking spray.

2. Spread about 2 cups chicken mixture over tortillas; sprinkle with 3/4 cup cheese. This is great time to add beans, olives or any other veggie you'd like. Repeat layer again. Top with remaining 6 tortilla halves. 

3. Combine your salsa verde of your choosing and reduced fat sour cream in a bowl. Mix until throughly combined. Layer on top of casserole. 

4. Bake casserole, covered with foil, for 30-35 minutes. Add remaining cheese, green onions (olives, optional) and bake, uncovered for about 5 minutes or until the cheese it melted.

5. Serves about 6-8, depending on how hungry the crowd is! I chose to serve my enchilada casserole atop a bed of baby spinach. This is a relatively healthier alternative to enchiladas, with each serving size between 400-485 calories, depending on what other veggies you added here. 


Monday, September 17, 2012

Cheese just makes everything better

While I'm all about cooking healthy, I just had to indulge in this recipe I found for mozzarella stuffed meatballs this Saturday. They were amazing, meaty, flavorful, and pretty darn heavy; but the occasion called for them, plus its not everyday I make meatballs (actually, almost never)! 

I didn't do much tweaking to this recipe, but I do wish I had made some sort of marinara sauce to put on top. Instead, I made some of my homemade pesto with pasta. Let's just say carb loading + meat stuffed cheese = extreme lethargy (which makes it very difficult to go out on a Saturday night!) I think the meatballs in marinara, with a veggie side, would make for an excellent wintertime meal. 

So here we go...


Mozzarella Stuffed Meatballs

Fancy, filtered meatballs.
Unfiltered photo, the cheese still looks ooey and gooey!

Ingredients: 
  • 2 tbs extra virgin olive oil
  • 1lb lean ground beef
  • 1 large egg
  • 1/2 cup finely chopped white onion
  • 1/2 cup Panko bread crumbs
  • 1/2 cup grated parmesan cheese
  • 1/4 cup milk
  • 2 tbs minced garlic
  • 1 tbs Worcestershire sauce
  • 1 tbs yellow mustard
  • 1 tsp hot sauce, like Tabasco
  • 1/2 tsp kosher salt
  • 1/4 tsp ground black pepper
  • 1/4 tsp garlic salt
Directions:
1.  Preheat oven to 35o degrees F. and grease 9×13-inch baking dish with oil.
2.  Place beef, egg, onion, bread crumbs, Parmesan, milk, garlic, Worcestershire, mustard, hot sauce, salt, pepper and garlic salt into a large mixing bowl, stirring until just combined.  Take 1/4 cup beef mixture and press into center with your thumb to make room for cheese ball.  Place cheese in middle then with hands enclose the cheese with the beef, making sure the cheese is completely covered.  Place meatballs into prepared baking dish and bake for 30 to 35 minutes, until cooked through.
3.  Serve over top your favorite pasta or inside a warm roll for delicious meatball sandwich. Makes about 10-12, one-inch mozzarella meatballs.

Thursday, September 13, 2012

Cooking or going to gym, we all know the obvious choice

This past Monday I had stress really getting to the best of me. As soon as I walked through my front door, I was confronted with the ultimate dilemma, go to gym or cook? It's like asking chicken or the egg...except not really. But I think both are good for my health. Since there is no such thing is summer here in San Francisco, I  turned my apartment into a crisper, cooking up a storm. The night ended with a big release, letting my frustrations out with two forks and some juicy chicken breasts, shredding away like my life depended on it!!

Well, it was less dramatic that that (although shredding the chicken was kind of fun!) and the end result was homemade taco bowls and Mexican shredded chicken; both were a success and total keepers! Both of these recipes came from the same site, Emily Bites, who is clearly obsessed with using cupcake tins to make anything...therefore dubbed GENIUS in my books. Kuddos Emily. 

So I'd seen these links floating around, on the interwebz, using cupcake tins to make taco bowls out of small, corn tortillas...except the tins were turned UPSIDE DOWN! These crevices literally hold anything you can stuff in a taco shell...or bowl in this case. I was going to use the standard, ground turkey, but sometimes I find it too dry for my liking; I wanted some moist (yup, used that word, deal, I know some you hate that word) chicken that was juicy, yet flavorful and light. And then I came upon this easy, affordable and versatile, recipe to make shredded Mexican chicken, which has lasted me days! Best of all, you don need a crockpot! (On that note, I really need one, I'm a terrible Indian girl for not owning one!)

Taco Bowls


adapted from Emily Bites

Ingredients:
  • 6, 6-inch corn tortillas
  • Cooking Spray
  • Water
  • Salt
Directions:

Preheat the oven to 375.  Sprinkle each tortilla lightly with water and stack them on a plate. Cover the top with another plate turned upside down and microwave the tortillas for 1 minute or until warm. 

Turn two 12 cup muffin pans upside down. Mist each side of a tortilla lightly with cooking spray and center it in the space between 4 muffin cups, creating a bowl. Repeat with the 5 remaining tortillas, forming 3 bowls on each tin. Bake in the oven for 8-10 minutes.

Shredded Mexican Chicken


adapted from Emily Bites

Ingredients:
  • 1 (8 oz) can tomato sauce
  • 2 tsp white wine vinegar
  • 3-4 cloves garlic, minced
  • 1 tsp chili powder
  • 4 tsp taco seasoning
  • 2 tsp oregano
  • ½ tsp sugar
  • salt & pepper to taste
  • 1 tb extra virgin olive oil
  • 1 ½ lbs boneless (about 3 pieces) skinless chicken breast
Directions:

In a medium bowl, mix together the tomato sauce, vinegar, garlic, chili powder, taco seasoning, oregano, sugar, salt and pepper until thoroughly combined. In a large skillet or sauté pan, bring the oil to medium-high heat. 

Add the chicken breasts in a single layer and cook for 3 minutes on one side, flip them over, and then continue to cook for 3 minutes on the other side. Add the tomato sauce mixture to the pan and bring it to a boil. Lower the heat to medium-low and cover the pan. Simmer for about 20-25 minutes until the chicken is fully cooked through. 

Remove the lid from the pan and transfer each breast to a cutting board, shredding it using two forks and then returning it to the sauce. When all the breasts are shredded, stir them into the sauce until thoroughly combined. Continue to cook for about 5 more minutes until the sauce thickens and soaks into the chicken. 

This dish is great in tacos, burritos, added to a salad and even by itself! 

Wednesday, September 5, 2012

Is it a cupcake or is it a muffin?

Technically, it can be consumed as both. As promised, I am finally, posting a cupcake recipe here! I've been cooking mostly savory dishes and have been so hungry, that I consume my meal before taking any pictures! This time around, I did some baking back at my parents, trying to utilize their significantly larger kitchen.

I made these cupcakes on Monday, after three straight days of Indian wedding festivities; while some were impressed that I mustered up the strength to bake, after sleeping minimal amounts,  I remind people that baking is like my version of watching Jersey Shore reruns on MTV... it can be mindless, depending on the recipe.

So I tried a recipe from the ever-famous, smitten kitchen, and to be honest I wasn't too impressed with the cupcake itself. It was very moist, yet dense and filling, but the flavor could have been more sweet.  I used less sugar, afraid that the frosting would make the whole cupcake way too sweet. My bad! That's what cooking is all about though, trial and error, trying to strike the right balance.

I did, however, learn a great insider tip on making cream cheese frosting more robust and keep it from becoming a melting mess!

CORNSTARCH! But just the slight amount, depending on the amount of frosting you are making.

Seriously though, this could very well be a delicious and substantial muffin, sans frosting. Tricking people with cupcakes disguised as muffins...just don't tell them I used full fat sour cream!

Summertime Peach Cupcakes with Brown Sugar Frosting

Hope one of them catches the bouquet!

Ingredients: 
Peach Cupcake
  • 3 cups flour
  • 1 1/2 teaspoons baking powder
  • 1 1/2 teaspoons baking soda
  • 1 teaspoon salt
  • pinch of nutmeg
  • 3/4 cup (1 1/2 sticks or 6 ounces) unsalted butter, at room temperature
  • 3/4 cup granulated sugar (I used about 1/2 cup here)
  • 3/4 cup dark or light brown sugar, packed (I used dark sugar for this recipe)
  • 2 large eggs
  • 1 teaspoon vanilla extract
  • 1 1/2 cups (12 ounces) buttermilk, sour cream or full-fat yogurt (Full fat sour cream, hell yeah!)
  • 3 large peaches, peeled, cored, and chopped smallish (Sometimes peaches are easy to peel, if not then peel with a knife)
Brown Sugar Frosting
  • 1-1 1/4 cups dark brown sugar
  • 3 tablespoons cornstarch
  • 1/2 cup powdered sugar
  • 1 8-ounce packages of cream cheese, at room temperature
  • 1/4 cup (4 tablespoons) unsalted butter, at room temperature
  • 1/2 teaspoon vanilla extract

Directions:

Preheat the oven to 350°F. Line 24 muffin cups with paper liners.

Sift together the flour, baking powder, baking soda, salt and nutmeg and set aside. 

Cream the butter and sugars together, beating until fluffy. Add the eggs, one at a time adding the vanilla. 

Gently mix in the buttermilk, sour cream or yogurt. 

Stir in the dry ingredients and fold in the peach chunks.

Divide the batter evenly among the prepared cupcake liners. 

Bake for 18 to 22 minutes, or until a tester inserted into the center of cupcakes comes out clean. 

Cool the cupcakes for five minutes in the tin, then turn them out onto a wire rack to cool completely.

For frosting:

In a small bowl, whisk together the brown sugar, cornstarch and powdered sugar. 

In a large bowl, beat the cream cheese and butter until fluffy. 

Add the sugar-cornstarch mixture and vanilla, beat until frosting is smooth and light. My frosting was already pretty sturdy, but if yours is not, chill the bowl in the refrigerator until it thickens back up a bit, about 30 minutes.

Frost cupcakes to the best of your abilities, I used a round tip here, no need to get that fancy though!